

How To Switch Cameras While Recording On Android
Nosotros all apply the camera on our phones and nosotros apply it a l-o-t. There are even some applications that take integrated the camera as a feature.
On 1 stop, there is a standard style of interacting with the camera. On the other, there is a style to customize your interaction with the photographic camera. This distinction is an important i to brand. And that'south where Camera2 comes in.
What is Camera2?
While it has been available since API level 21, the Camera2 API has got to be 1 of the more complex pieces of architecture developers have to bargain with.
This API and its predecessor were put in place so developers could harness the ability of interacting with the camera within of their applications.
Similar to how there is a mode to interact with the microphone or the book of the device, the Camera2 API gives you the tools to interact with the device's photographic camera.
In general, if yous want to user the Camera2 API, information technology would probably be for more than just taking a pic or recording a video. This is because the API lets yous accept in depth control of the camera past exposing various classes that volition need to be configured per specific device.
Even if you lot've dealt with the photographic camera previously, it is such a drastic alter from the former camera API, that you lot might every bit well forget all that y'all know.
At that place are a ton of resource out at that place that try to showcase how to utilize this API directly, just some of them may exist outdated and some don't nowadays the whole picture.
So, instead of trying to make full in the missing pieces by yourself, this article will (hopefully) be your one end store for interacting with the Camera2 API.
Camera2 Employ Cases
Before we dive into anything, it is important to understand that if you only want to utilize the camera to take a picture or to record a video, you do not need to bother yourself with the Camera2 API.
The primary reason to use the Camera2 API is if your awarding requires some custom interaction with the camera or its functionality.
If you are interested in doing the former instead of the latter, I'll suggest that you visit the post-obit documentation from Google:
- Take Photos
- Capture Video
At that place you will observe all the necessary steps yous need to take to capture great photos and videos with your camera. But in this article, the chief focus will exist on how to use Camera2.
Now, there are some things we need to add together to our manifest file:
Camera permissions:
<uses-permission android:proper name="android.permission.Photographic camera" /> Camera characteristic:
<uses-feature android:proper name="android.hardware.camera" /> You will have to deal with checking if the camera permission has been granted or not, just since this topic has been covered widely, nosotros won't be dealing with that in this commodity.
How to Set up the Camera2 API Components
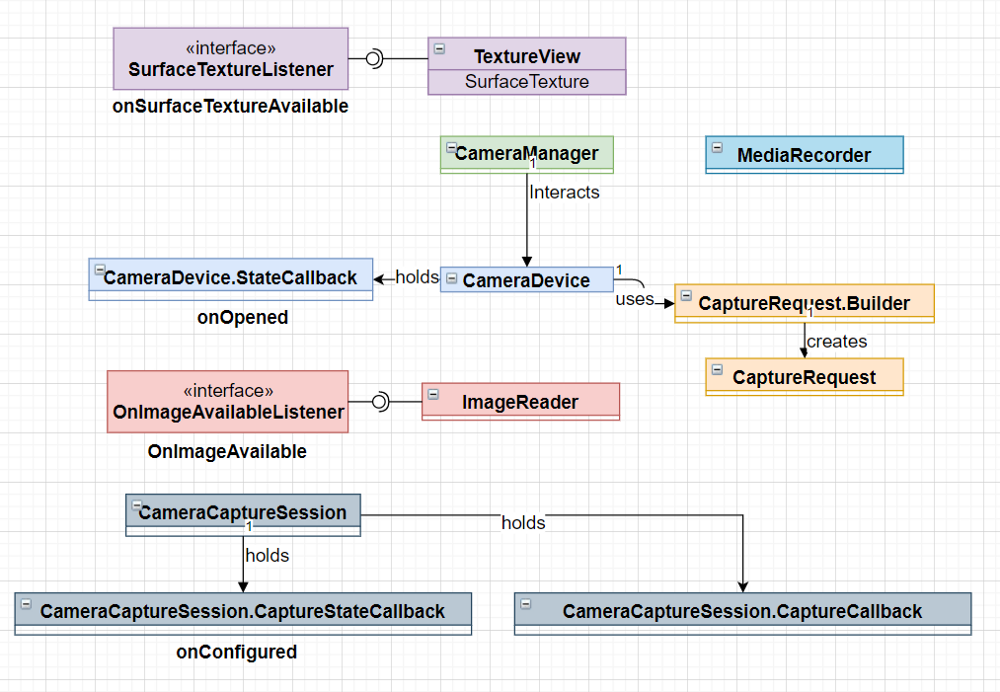
The Camera2 API introduces several new interfaces and classes. Permit'southward interruption down each of them so we tin can better understand how to use them.
First off, nosotros'll start with the TextureView.
Camera2 TextureView Component
A TextureView is a UI component that y'all use to display a content stream (recollect video). We need to employ a TextureView to brandish the feed from the photographic camera, whether it's a preview or before taking the flick/video.
Two backdrop that are important to use regarding the TextureView are:
- The SurfaceTexture field
- The SurfaceTextureListener interface
The showtime is where the content will get displayed, and the second has four callbacks:
- onSurfaceTextureAvailable
- onSurfaceTextureSizeChanged
- onSurfaceTextureUpdated
- onSurfaceTextureDestroyed
private val surfaceTextureListener = object : TextureView.SurfaceTextureListener { override fun onSurfaceTextureAvailable(texture: SurfaceTexture, width: Int, height: Int) { } override fun onSurfaceTextureSizeChanged(texture: SurfaceTexture, width: Int, acme: Int) { } override fun onSurfaceTextureDestroyed(texture: SurfaceTexture) { } override fun onSurfaceTextureUpdated(texture: SurfaceTexture) { } } The outset callback is crucial when using the camera. This is because we want to be notified when the SurfaceTexture is available so we can beginning displaying the feed on it.
Exist aware that only once the TextureView is attached to a window does it get available.
Interacting with the camera has changed since the previous API. Now, nosotros have the CameraManager. This is a system service that allows u.s. to interact with CameraDevice objects.
The methods you want to pay close attention to are:
- openCamera
- getCameraCharacteristics
- getCameraIdList
Afterwards nosotros know that the TextureView is bachelor and ready, we demand to call openCamera to open a connectedness to the camera. This method takes in iii arguments:
- CameraId - String
- CameraDevice.StateCallback
- A Handler
The CameraId statement signifies which camera we want to connect to. On your telephone, there are mainly 2 cameras, the front and the back. Each has its own unique id. Usually, information technology is either a null or a one.
How do we get the photographic camera id? We use the CameraManager's getCamerasIdList method. It will return an array of string type of all the photographic camera ids identified from the device.
val cameraManager: CameraManager = getSystemService(Context.CAMERA_SERVICE) equally CameraManager val cameraIds: Array<String> = cameraManager.cameraIdList var cameraId: Cord = "" for (id in cameraIds) { val cameraCharacteristics = cameraManager.getCameraCharacteristics(id) //If we want to choose the rear facing camera instead of the front end facing one if (cameraCharacteristics.become(CameraCharacteristics.LENS_FACING) == CameraCharacteristics.LENS_FACING_FRONT) continue } val previewSize = cameraCharacteristics.go(CameraCharacteristics.SCALER_STREAM_CONFIGURATION_MAP)!!.getOutputSizes(ImageFormat.JPEG).maxByOrNull { it.height * it.width }!! val imageReader = ImageReader.newInstance(previewSize.width, previewSize.height, ImageFormat.JPEG, 1) imageReader.setOnImageAvailableListener(onImageAvailableListener, backgroundHandler) cameraId = id } The next arguments are callbacks to the camera country after we try to open it. If you call back about it, there can merely exist several outcomes for this action:
- The photographic camera manages to open successfully
- The camera disconnects
- Some error occurs
And that'south what you will find inside the CameraDevice.StateCallback:
private val cameraStateCallback = object : CameraDevice.StateCallback() { override fun onOpened(photographic camera: CameraDevice) { } override fun onDisconnected(cameraDevice: CameraDevice) { } override fun onError(cameraDevice: CameraDevice, error: Int) { val errorMsg = when(error) { ERROR_CAMERA_DEVICE -> "Fatal (device)" ERROR_CAMERA_DISABLED -> "Device policy" ERROR_CAMERA_IN_USE -> "Photographic camera in use" ERROR_CAMERA_SERVICE -> "Fatal (service)" ERROR_MAX_CAMERAS_IN_USE -> "Maximum cameras in use" else -> "Unknown" } Log.due east(TAG, "Mistake when trying to connect camera $errorMsg") } } The third statement deals with where this work will happen. Since nosotros don't desire to occupy the master thread, it is ameliorate to do this work in the background.
That's why nosotros need to laissez passer a Handler to it. It would be wise to have this handler instance instantiated with a thread of our choosing and then nosotros can delegate work to it.
individual lateinit var backgroundHandlerThread: HandlerThread private lateinit var backgroundHandler: Handler individual fun startBackgroundThread() { backgroundHandlerThread = HandlerThread("CameraVideoThread") backgroundHandlerThread.first() backgroundHandler = Handler( backgroundHandlerThread.looper) } private fun stopBackgroundThread() { backgroundHandlerThread.quitSafely() backgroundHandlerThread.bring together() } With everything that we accept done, we tin can now call openCamera:
cameraManager.openCamera(cameraId, cameraStateCallback,backgroundHandler) So in the onOpened callback, nosotros can start to deal with the logic on how to nowadays the camera feed to the user via the TextureView.
How to Show a Preview of the Feed
Nosotros've got our camera (cameraDevice) and our TextureView to show the feed. But nosotros need to connect them to each other so nosotros can testify a preview of the feed.
To do that, nosotros will be using the SurfaceTexture belongings of TextureView and nosotros will be building a CaptureRequest.
val surfaceTexture : SurfaceTexture? = textureView.surfaceTexture // 1 val cameraCharacteristics = cameraManager.getCameraCharacteristics(cameraId) //2 val previewSize = cameraCharacteristics.get(CameraCharacteristics.SCALER_STREAM_CONFIGURATION_MAP)!! .getOutputSizes(ImageFormat.JPEG).maxByOrNull { it.acme * it.width }!! surfaceTexture?.setDefaultBufferSize(previewSize.width, previewSize.height) //iii val previewSurface: Surface = Surface(surfaceTexture) captureRequestBuilder = cameraDevice.createCaptureRequest(CameraDevice.TEMPLATE_PREVIEW) //4 captureRequestBuilder.addTarget(previewSurface) //five cameraDevice.createCaptureSession(listOf(previewSurface, imageReader.surface), captureStateCallback, null) //half-dozen In the lawmaking above, beginning we become the surfaceTexture from our TextureView. Then we use the cameraCharacteristics object to go the listing of all output sizes. To get the desired size, nosotros set it for the surfaceTexture.
Next, we create a captureRequest where nosotros laissez passer in TEMPLATE_PREVIEW. We add our input surface to the captureRequest.
Finally, nosotros get-go a captureSession with our input and output surfaces, captureStateCallback, and pass in zippo for the handler
Then what is this captureStateCallback? If you remember the diagram from the commencement of this article, it is role of the CameraCaptureSession which we are starting. This object tracks the progress of the captureRequest with the following callbacks:
- onConfigured
- onConfigureFailed
private val captureStateCallback = object : CameraCaptureSession.StateCallback() { override fun onConfigureFailed(session: CameraCaptureSession) { } override fun onConfigured(session: CameraCaptureSession) { } } When the cameraCaptureSession is configured successfully, we gear up a repeating request for the session to allow us to show the preview continuously.
To practice that, we utilise the session object nosotros go far the callback:
session.setRepeatingRequest(captureRequestBuilder.build(), zilch, backgroundHandler) Yous will recognize our captureRequestBuilder object that we created earlier as the first argument for this method. Nosotros enact the build method so the final parameter passed in is a CaptureRequest.
The second statement is a CameraCaptureSession.captureCallback listener, but since nosotros don't want to do annihilation with the captured images (since this is a preview), we pass in cypher.
The third argument is a handler, and here we utilize our ain backgroundHandler. This is besides why we passed in goose egg in the previous section, since the repeating request will run on the background thread.
How to Take a Moving-picture show
Having a live preview of the camera is awesome, but most users will probably want to do something with it. Some of the logic that we will write to accept a film will exist like to what we did in the previous section.
- We will create a captureRequest
- We volition use an ImageReader and its listener to gather the photograph taken
- Using our cameraCaptureSession, nosotros will invoke the capture method
val orientations : SparseIntArray = SparseIntArray(4).apply { suspend(Surface.ROTATION_0, 0) suspend(Surface.ROTATION_90, 90) append(Surface.ROTATION_180, 180) suspend(Surface.ROTATION_270, 270) } val captureRequestBuilder = cameraDevice.createCaptureRequest(CameraDevice.TEMPLATE_STILL_CAPTURE) captureRequestBuilder.addTarget(imageReader.surface) val rotation = windowManager.defaultDisplay.rotation captureRequestBuilder.gear up(CaptureRequest.JPEG_ORIENTATION, orientations.go(rotation)) cameraCaptureSession.capture(captureRequestBuilder.build(), captureCallback, null) But what is this ImageReader? Well, an ImageReader provides access to image data that is rendered onto a surface. In our case, it is the surface of the TextureView.
If you look at the code snippet from the previous section, you volition notice nosotros have already defined an ImageReader in that location.
val cameraManager: CameraManager = getSystemService(Context.CAMERA_SERVICE) as CameraManager val cameraIds: Array<Cord> = cameraManager.cameraIdList var cameraId: Cord = "" for (id in cameraIds) { val cameraCharacteristics = cameraManager.getCameraCharacteristics(id) //If nosotros desire to choose the rear facing camera instead of the front facing i if (cameraCharacteristics.go(CameraCharacteristics.LENS_FACING) == CameraCharacteristics.LENS_FACING_FRONT) go on } val previewSize = cameraCharacteristics.become(CameraCharacteristics.SCALER_STREAM_CONFIGURATION_MAP)!!.getOutputSizes(ImageFormat.JPEG).maxByOrNull { it.height * it.width }!! val imageReader = ImageReader.newInstance(previewSize.width, previewSize.height, ImageFormat.JPEG, 1) imageReader.setOnImageAvailableListener(onImageAvailableListener, backgroundHandler) cameraId = id } As you lot can see in a higher place, we instantiate an ImageReader by passing in a width and height, the paradigm format we would like our epitome to exist in and the number of images that information technology can capture.
A property the ImageReader class has is a listener called onImageAvailableListener. This listener will go triggered once a photo is taken (since we passed in its surface as the output source for our capture request).
val onImageAvailableListener = object: ImageReader.OnImageAvailableListener{ override fun onImageAvailable(reader: ImageReader) { val image: Image = reader.acquireLatestImage() } } ⚠️ Make sure to close the image after processing it or else y'all will not be able to accept another photo.
How to Record a Video
To record a video, we need to interact with a new object chosen MediaRecorder. The media recorder object is in accuse of recording audio and video and we will be using information technology do simply that.
Before we do anything, we need to setup the media recorder. At that place are various configurations to deal with and they must be in the correct order or else exceptions volition be thrown.
Below is an instance of a selection of configurations that will allow us to capture video (without audio).
fun setupMediaRecorder(width: Int, acme: Int) { val mediaRecorder: MediaRecorder = MediaRecorder() mediaRecorder.setVideoSource(MediaRecorder.VideoSource.SURFACE) mediaRecorder.setOutputFormat(MediaRecorder.OutputFormat.MPEG_4) mediaRecorder.setVideoEncoder(MediaRecorder.VideoEncoder.H264) mediaRecorder.setVideoSize(videoSize.width, videoSize.height) mediaRecorder.setVideoFrameRate(30) mediaRecorder.setOutputFile(PATH_TO_FILE) mediaRecorder.setVideoEncodingBitRate(10_000_000) mediaRecorder.prepare() } Pay attention to the setOutputFile method as information technology expects a path to the file which will store our video. At the end of setting all these configurations we need to phone call set up.
Note that the mediaRecorder also has a get-go method and we must phone call prepare before calling information technology.
After setting upwards our mediaRecoder, we need to create a capture request and a capture session.
fun startRecording() { val surfaceTexture : SurfaceTexture? = textureView.surfaceTexture surfaceTexture?.setDefaultBufferSize(previewSize.width, previewSize.peak) val previewSurface: Surface = Surface(surfaceTexture) val recordingSurface = mediaRecorder.surface captureRequestBuilder = cameraDevice.createCaptureRequest(CameraDevice.TEMPLATE_RECORD) captureRequestBuilder.addTarget(previewSurface) captureRequestBuilder.addTarget(recordingSurface) cameraDevice.createCaptureSession(listOf(previewSurface, recordingSurface), captureStateVideoCallback, backgroundHandler) } Similar to setting up the preview or taking a photograph, we have to define our input and output surfaces.
Hither we are creating a Surface object from the surfaceTexture of the TextureView and besides taking the surface from the media recorder. We are passing in the TEMPLATE_RECORD value when creating a capture request.
Our captureStateVideoCallback is of the aforementioned blazon we used for the still photo, simply inside the onConfigured callback nosotros call media recorder's start method.
val captureStateVideoCallback = object : CameraCaptureSession.StateCallback() { override fun onConfigureFailed(session: CameraCaptureSession) { } override fun onConfigured(session: CameraCaptureSession) { session.setRepeatingRequest(captureRequestBuilder.build(), nil, backgroundHandler) mediaRecorder.start() } } Now we are recording a video, but how do we cease recording? For that, we volition be using the finish and reset methods on the mediaRecorder object:
mediaRecorder.stop() mediaRecorder.reset() Conclusion
That was a lot to process. So if you fabricated information technology here, congratulations! There is no fashion effectually information technology – only by getting your hands dirty with the code will you lot starting time to sympathize how everything connects together.
You are more than encouraged to look at all the code featured in this article beneath :
MediumArticles/Camrea2API at master · TomerPacific/MediumArticles
A repository that contains lawmaking associated with various Medium articles I take written - MediumArticles/Camrea2API at principal · TomerPacific/MediumArticles
 GitHub
Comport in listen that this is only the tip of the iceberg when it comes to the Camera2 API. There are a lot of other things you tin do, like capturing a tedious motion video, switching between the front and dorsum cameras, controlling the focus, and much more.
Learn to code for free. freeCodeCamp's open source curriculum has helped more than 40,000 people go jobs as developers. Become started
Source: https://www.freecodecamp.org/news/android-camera2-api-take-photos-and-videos/
Posted by: cookboun1947.blogspot.com
0 Response to "How To Switch Cameras While Recording On Android"
Post a Comment