

How To Unsubcribe To Blog On Chrome
Blogger Setup
How to set up OneSignal Web Push notifications on Blogger sites
This guide will walk you through how to set up web push on Blogger. If you do not use Blogger, or wish to write custom code, please go to Web Push Quickstart.
At any time to get back to setup, go to App Settings and click Configure for the Google Chrome platform (instructions for Safari are here).
OneSignal supports sending web push notifications from a variety of different web technologies. Select Blogger to continue:

Once you've selected Blogger as your integration, you must fill out information about your site.

This must be the exact URL you see in the browser when you visit the site.
Most users just enter their base site URL for this field (e.g. https://example.com).
If your site is accessible from both www & non-www links (e.g. hexample.com AND www.example.com), please only enter the URL that you wish to send push notifications from. We recommend redirect traffic from one to the other (e.g. users that visit example.com are redirected to www.example.com), so that all your traffic only goes to one.
Recommended: This feature is only for HTTPS sites and if you do not select "My site is not fully HTTPS". This allows users to automatically resubscribe upon returning to the site without being prompted if they clear their browser cache or if you are transferring to OneSignal from another push provider.
Enter a link to an icon file that is at least 80x80 pixels. Recommended size is 192x192. The file must be .png, .jpg, or .gif.
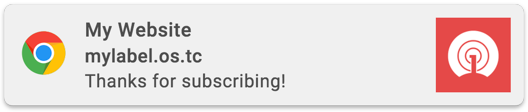
Blogger implementations must choose a unique label to be displayed in your notifications. For example, the below image shows notifications are coming from mylabel.os.tc:
Warning: You can only change your label if you have less than 100 web users. Once you have 100+ web users, this setting is disabled.
How does OneSignal work differently with HTTP sites?
Why does my site require a label?
Why can't I change my label?
To send push notifications to users, you first must ask them for permission using a Prompt. You must have at least one Prompt on your site for web push to work. Click Add a Prompt to open the permission prompt selector.
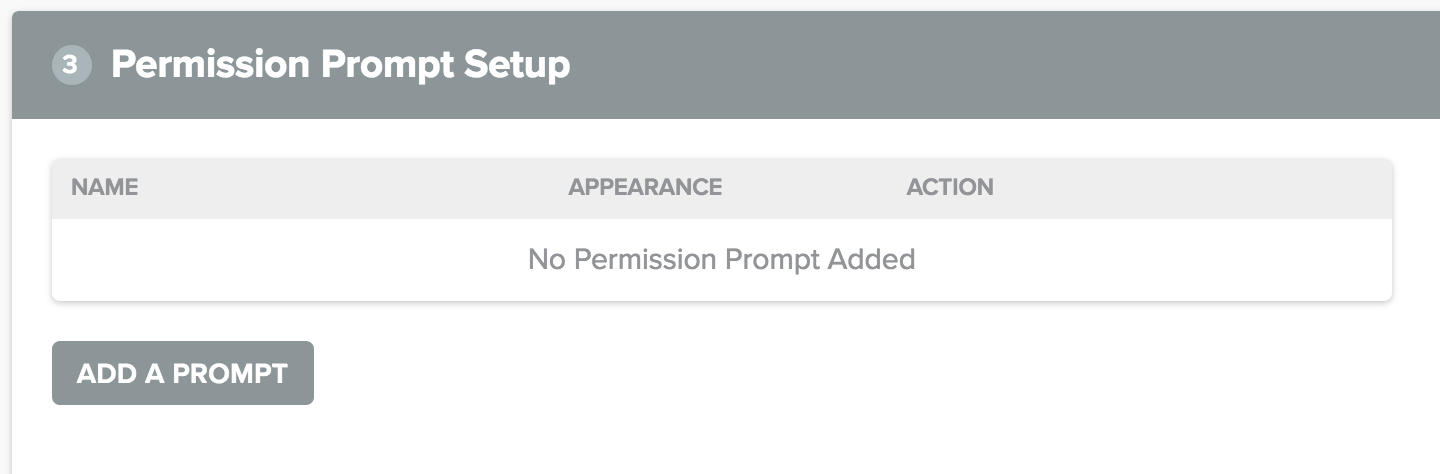
In the Permission Prompt Editor, you can select which prompts you wish to use, and style them as you like. Once you have edited the prompt to your liking, click Save.

Subscription Bell - a small icon at the corner of your page that users can interact with to subscribe
Slide Prompt - a small modal that comes from the center of the page and asks if users are interested in signing up.
HTTP Pop-Up Prompt - a pop-up window that appears after other prompts that is required for HTTP sites.
Custom Link prompt - create your own links or buttons as prompts.
Welcome notifications an optional way to thank users after subscribing to your site. Users will see a welcome notification as soon as they subscribe. You can edit or disable them here.

Most sites will not have to edit anything in Advanced options. See Web Push Advanced Options to learn more about each option.
To enable OneSignal on your Blogger site, you will need to copy the code from Web Push Settings.

Next, go to your Blogger Dashboard and click Theme. Then click Edit HTML:

Next, paste the code into your Blogger theme's <head> and click Save theme:

👍
You're Done!
Visit your site and subscribe! You should see your device show up in the OneSignal Dashboard Audience page. If now, see Troubleshooting Web Push.
Once you are subscribed jump to Send your first push notification via the OneSignal Dashboard.
![]() Updated about a year ago
Updated about a year ago
How To Unsubcribe To Blog On Chrome
Source: https://documentation.onesignal.com/docs/blogger
Posted by: cookboun1947.blogspot.com
0 Response to "How To Unsubcribe To Blog On Chrome"
Post a Comment